A Technical Overview of Taproot Outputs and MuSig2


Overview
This post will cover some basics around Taproot outputs and how to spend them via either the key or script paths. It will also cover the MuSig2 flow between two signing parties. Note that I won’t go into extreme detail for either of these topics. Instead, this post is aimed at refreshing your memory on these topics or giving you enough of an understanding of how Taproot outputs and MuSig2 work so that the follow-up articles are more easily digestible. There are better articles out there for you if you want to get into the nitty-gritty of these topics and of course you can always go check out the BIPs if you are brave: Schnorr signatures, Taproot, Tapscript and MuSig2.
Ok, enough chit-chat. Onto the good stuff!
A quick note on BIP340 public keys
Public keys will mostly be encoded as 32-byte arrays instead of the usual
33-byte compressed public key representation that you might be used to. If the
secp256k1 curve is plotted over a non-finite field (as shown below) then you can
see that for every x-coordinate, there are two possible y-coordinates. Since the
curve is actually over a finite field with an odd order, one y-coordinate for a
given x-coordinate will always be even and the other one will be odd. The
assumption for 32-byte encoded public keys is that the y-coordinate is always
the even one. This means that if you want to create a valid BIP340 signature but
your private key, d, produces a public key, P, with an odd y-coordinate,
then all you need to do is negate your private key. This will produce public
key P’ which has the same x-coordinate as your original public key but with an
even y-coordinate. For more information regarding BIP340 public keys and
signatures (also known as Schnorr signatures), check out the BIP
itself.

Taproot Outputs
A Taproot output shows up in the scriptPubKey section of a transaction (just
like all other outputs) and has the following form:
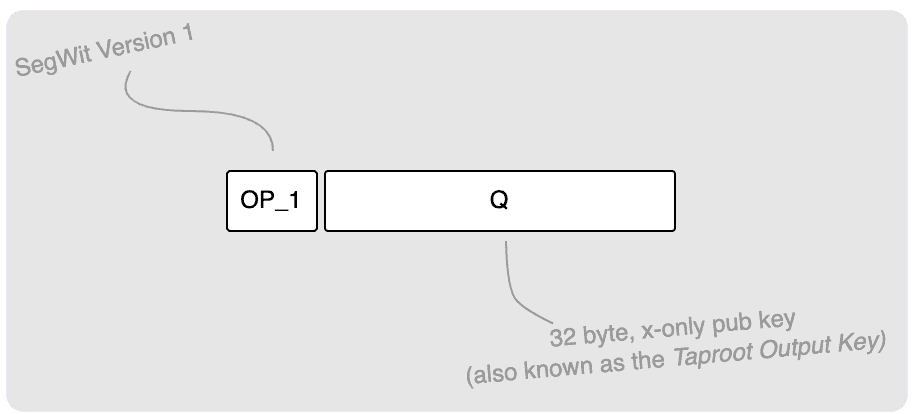
The OP_1 indicates that this is a SegWit Version 1 output (a.k.a. Taproot
output) and what follows are 32 bytes that represent the output key (see
BIP340 public keys above). I will often
use Q to refer to this key. To give the full picture, here is a Taproot
output in a transaction:
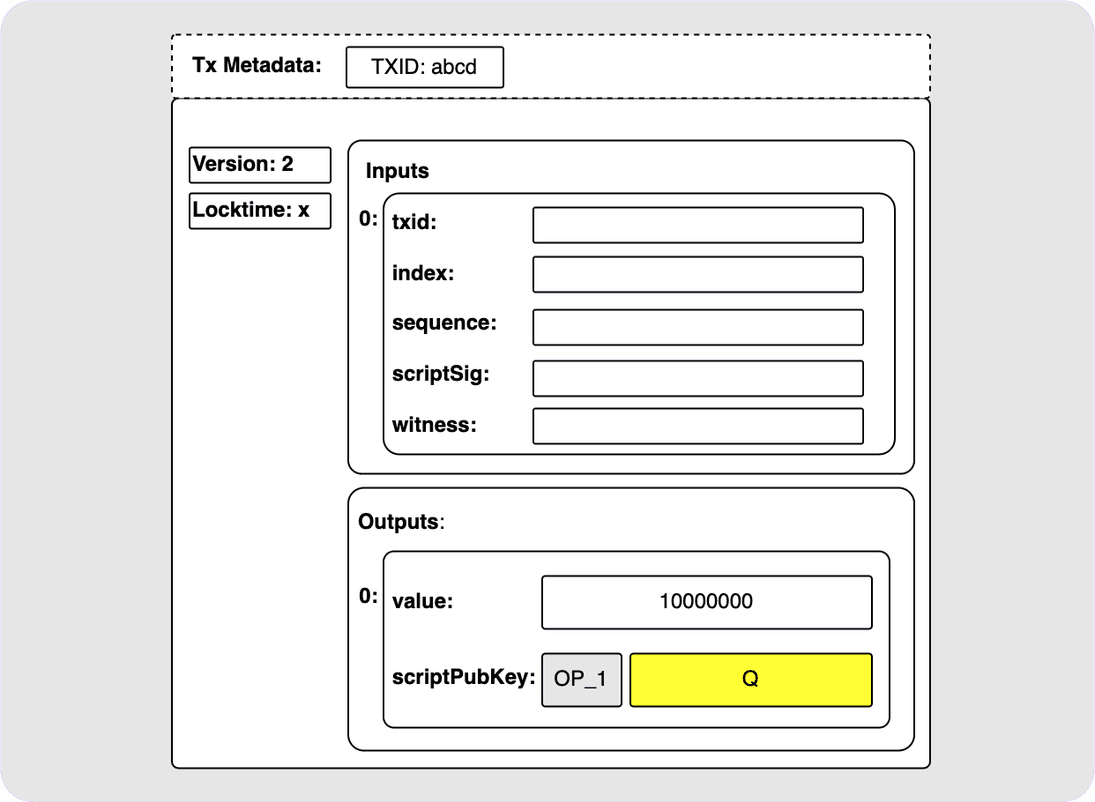
Ok cool. But what exactly is in this output? Is it just like a P2PK output? No. That would be lame. The truth is that this simple-looking output could be a huge variety of different things. It could be a simple single public key (yes, like a P2PK). It could be an n-of-n MuSig2 public key. It could also have a bunch of script branch options, or it could even be a combination of all the above! Let’s break these options down a bit.
Single Key or n-of-n MuSig2 outputs
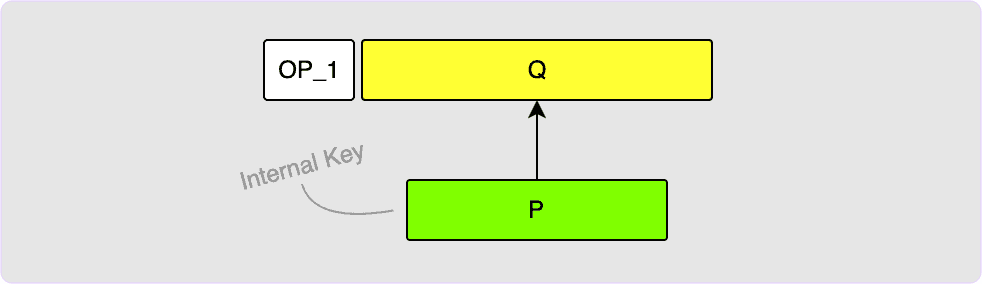
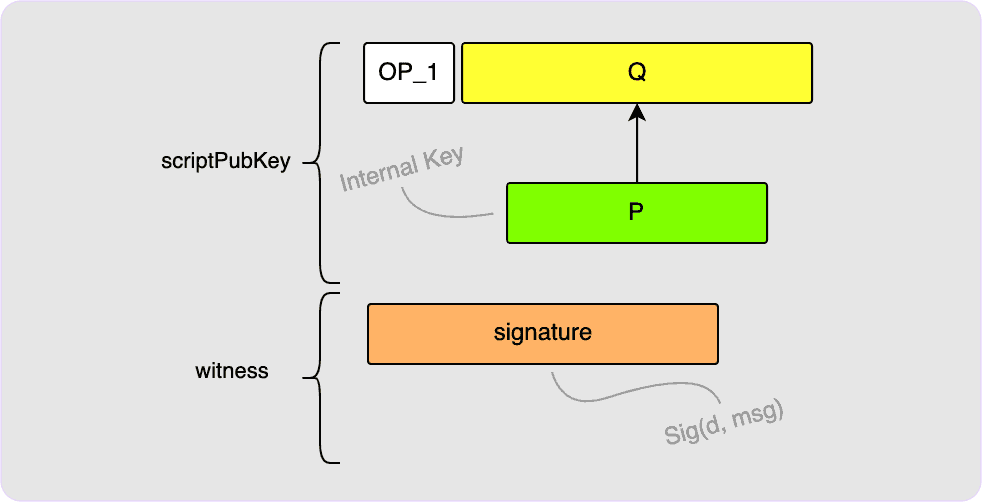
If you wanted to just create an output that sends to a single public key, P,
then this is easy to do. In this case, your output key, Q, just becomes your
key, P, which is often called the internal key.
To spend this output, all you need is to provide a BIP340 signature in the
witness which you would calculate using the private key, d, used to derive
P. See the note explained in the BIP340 Public
Keys section about possibly needing to
negate your private key first.
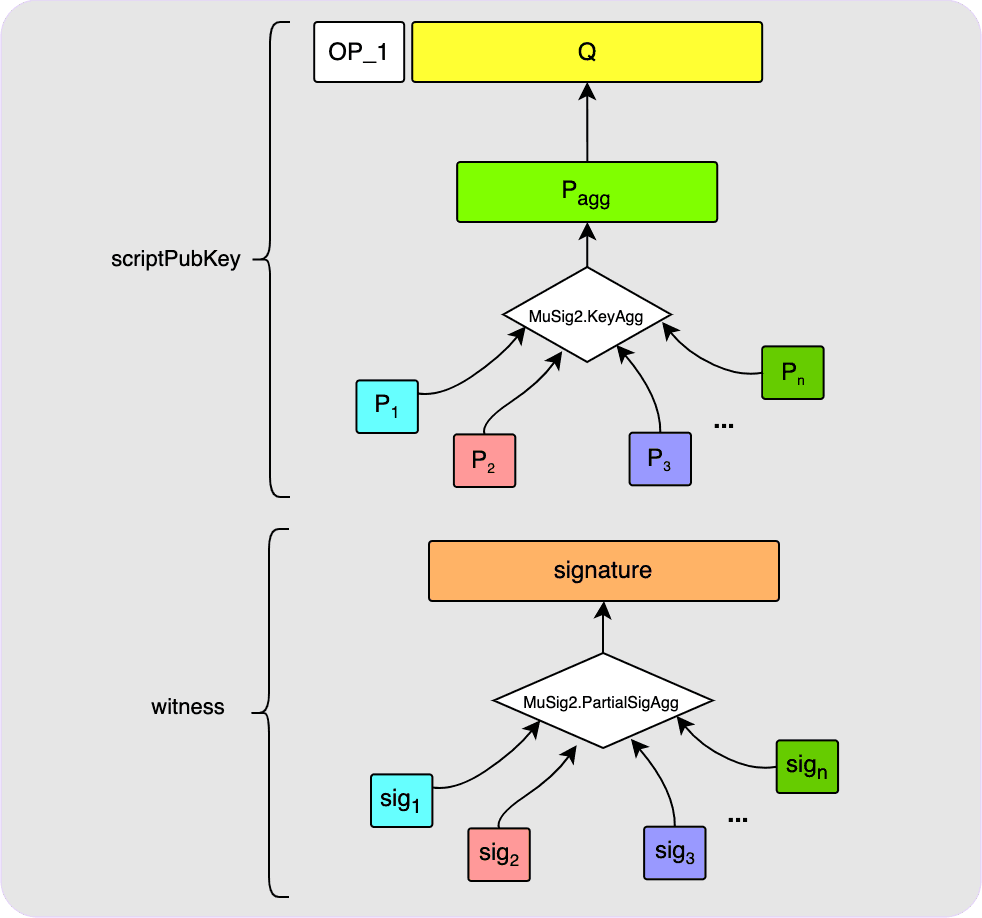
Now, what if you instead wanted to use an n-of-n aggregate MuSig2 public key? Turns out that this will look exactly the same on-chain as for the single key case explained above! All that changes is the steps that you and your fellow signers need to take to set up the aggregate public key and then to calculate the final signature. But once all that is complete, what ends up on-chain looks no different.
Script Paths
Here is where the magic really happens. You can also have the option of spending your Taproot output via a script and each output can have multiple scripts from which it can be spent. Another cool thing is that if you choose to include script paths in your Taproot output, you can still add a regular key path like before. Let’s say, for example, that you want to be able to spend your output at any time, but you also want to add three script paths so that it can also be spent in other scenarios: perhaps after 30 days you want your partner to be able to spend the output. That would be one script path. If you also have two other script paths (perhaps one is a 2-of-3 multi-sig and the other requires a pre-image reveal), then your Taproot output would be constructed as follows:
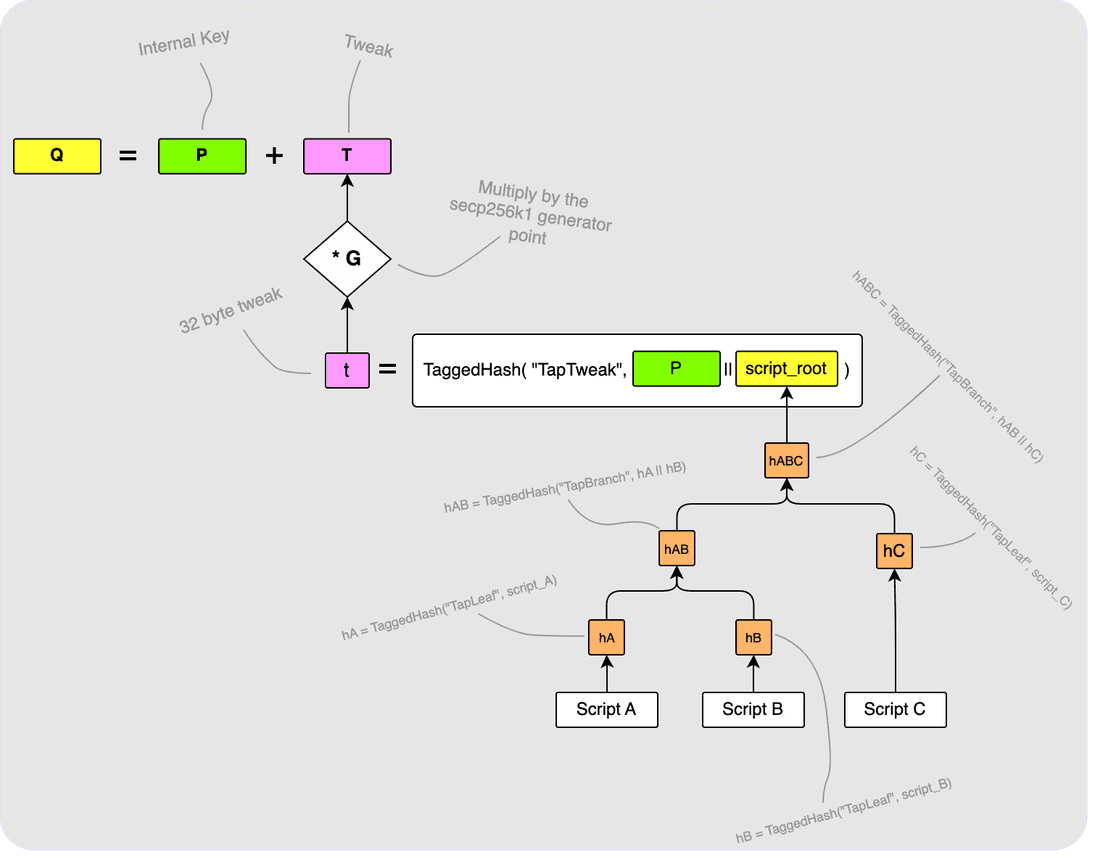
Let’s walk through the above diagram a bit:
First, the three scripts (Script A, Script B and Script C) are all put
into a Merkle tree as shown bottom right. The root of this Merkle tree
is then hashed along with our internal key, P, to get the 32-byte tweak, t.
This tweak is converted to its elliptic curve point form by multiplying it with
the generator point, G, to get T which is then added to our internal key,
P, to get the final output key, Q. I have skipped over some things here such
as the details of the script encodings and also how the scripts are hashed in
the Merkle tree so check out the relevant BIPs if you are interested.
Alrighty - our fancy Taproot output has been set up! But now… how do we spend
it? There are two ways of spending this transaction: the first is via the
internal key, P. We call this a key path spend. The
other way is via one of the scripts in the tree. This type of spend is called a
script path spend.
Key Path Spends
Spending via the key path is very simple and is similar to spending the output
if it was just a normal un-tweaked key as described earlier
on. The only difference is that you will
need to tweak your private key, d, with the tweak, t. In other words, your
new private key becomes d + t which is what you will use to calculate your
signature. That’s it! If you spend the output via the key path, there is no
need to reveal any of the scripts and so anyone looking at the spend on-chain
will have no clue that the output even had the potential to be spent via a
script path.
Script Path Spends
To spend via one of the script paths requires a slightly more complicated
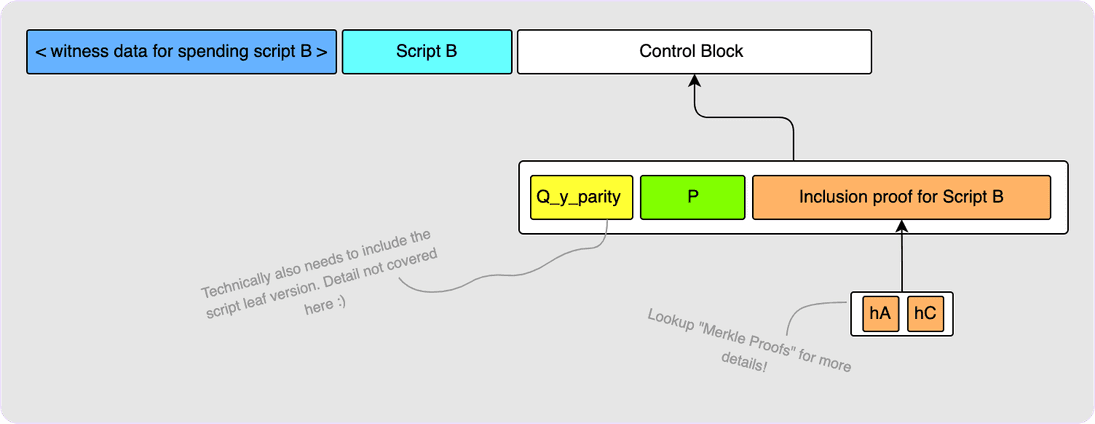
witness. Let’s say we want to spend via Script B. We will need to do a few
things to convince a verifier that we have the right to spend the output:
- We must provide a valid spending script for
Script B. - We need to prove that
Script Bis actually embedded in the output.
Step 1 is pretty simple: just provide the valid witness script for Script B
along with Script B itself. Step 2 is slightly more involved. To prove that
Script B is embedded in Q, we need to give the verifier all the building
blocks required in order to actually construct Q. These building blocks are
put in what is called the “control block”. The first thing in the control block
is the internal key, P. It also contains the Merkle proof that allows the
verifier to compute the Merkle tree root. The witness already includes
Script B itself (it was required for step 1), so the verifier can compute
hB (see the diagram above showing the Merkle tree construction) themselves,
and so we just need to provide hA and hC. The validator will use these
hashes to calculate the script_root and then hash this along with the
internal key, P, in order to arrive at the tweak, t. The validator can then
compute the corresponding tweak point, T, add that to the internal key, P,
to get the output key, Q. The final thing that the control block must include
is a bit indicating if the final Q point has an odd or even y-coordinate so
that the validator can check if the Q they computed does have the correct
y-coordinate.
It is important to note that no knowledge of d (the private key for the
internal key, P) was required for spending via Script B (assuming of course
that Script B itself does not involve P). Another cool thing is that we did
not need to reveal the contents of the other scripts in the tree, only their
hashes.
BIP86 Tweaks
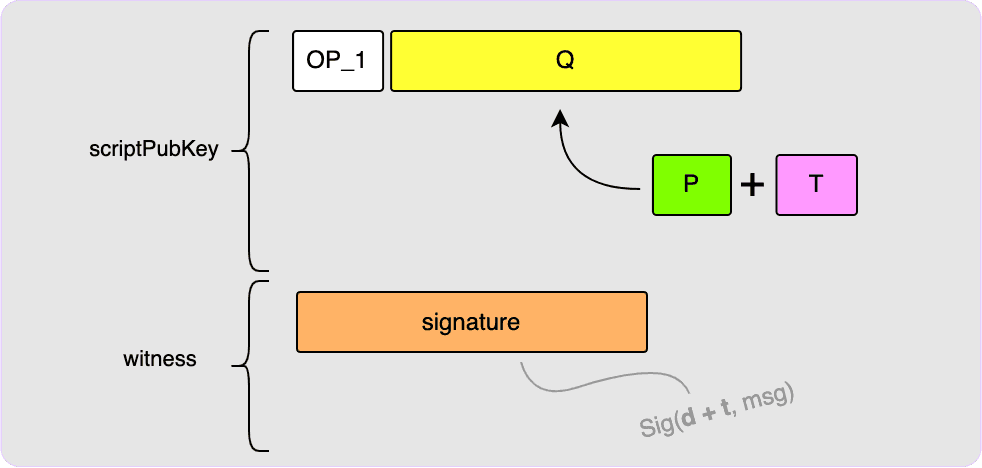
There is a clever trick that can be used if you would like to create an output
with no script path that allows you to also prove to a third party that there
is no script path. All you do is construct Q as if you were constructing an
output with script paths but the script root is left empty.

Spending this output can now only be done via the key spend path using private
key d + t. Then, P can be provided to any third parties who want proof that
there is no script path. They would use P to compute t and T and then
would verify that P + T is equal to the output key, Q. More info about this
can be found in BIP86.
MuSig2
With the Taproot soft fork, bitcoin nodes now have an understanding of BIP340
signatures (or Schnorr signatures). The beauty of these signatures is their
linearity: the owner of public key P_1 can create a partial signature,
sig_1 for the message msg and the owner of public key P_2 can create
sig_2 for the same message. The two parties will then be able to combine their
signatures such that sig where sig = sig_1 + sig_2 is a valid signature for
the aggregate of their public keys: P = P_1 + P_2.
This is really cool because it means that instead of needing to create a long
n-of-n multisig script and then needing to pay for the blockchain space to store
each of the n signatures, only one signature will be needed and no long script
will be required at all. Instead, only a single public key (which is actually an
aggregate public key) needs to appear on-chain.
The tricky part here is everything that needs to happen off-chain during the setup of this aggregate public key as well as for the creation of the final signature. MuSig2 is the protocol that defines how this should be done. The various steps have been carefully thought through in order to keep the process trust-less and to protect parties from attacks such as key cancellation.
BIP327 defines the MuSig2 protocol along with a bunch of algorithms that should be used for the various steps of the process. Since the aim of this article is to provide all the building blocks required for understanding Lightning Taproot channels, I will only talk about MuSig2 at an API level using the defined algorithms and will focus more on how it will be used in Lightning. If you would like to dig into it more you can check out the BIP itself. I have also implemented all the MuSig2 methods from scratch here if you are the type of person who prefers looking at code.
MuSig2 vs n-of-n Multisig
An important thing to keep in mind is that with n-of-n multisig outputs, parties
can generate their signatures completely independently of the other parties. As
long as they have the message to be signed along with their private key, they
can create a signature. This signature can then safely be distributed to the
other parties and eventually the transaction witness will have all n
signatures. In other words: no interaction is required between parties at
signing time. With n-of-n MuSig2 this is not the case since there is one
public key on-chain and thus one signature needs to be produced. The n parties
have to interact with each other in order to produce this final signature.
Explanation by example
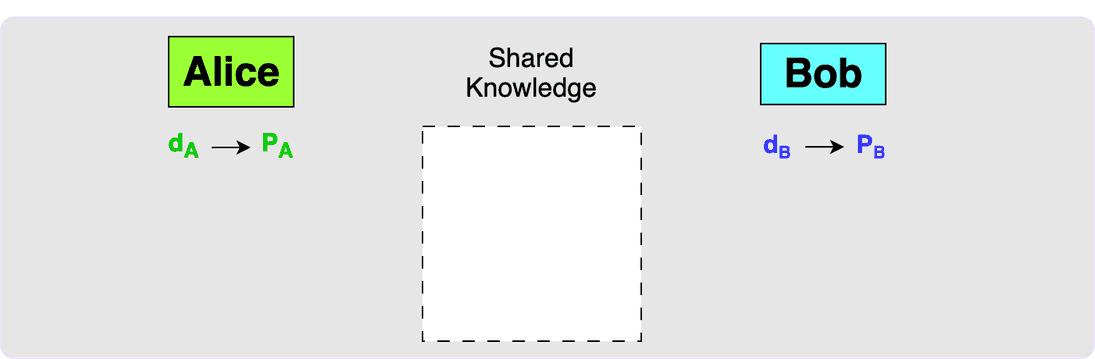
Let’s walk through the case where two parties, Alice and Bob, want to set up a 2-of-2 MuSig2 output and then create a signature to spend from it.
This first diagram shows the initial state: Alice and Bob both have private keys and the corresponding public keys and currently the two parties have no shared knowledge.
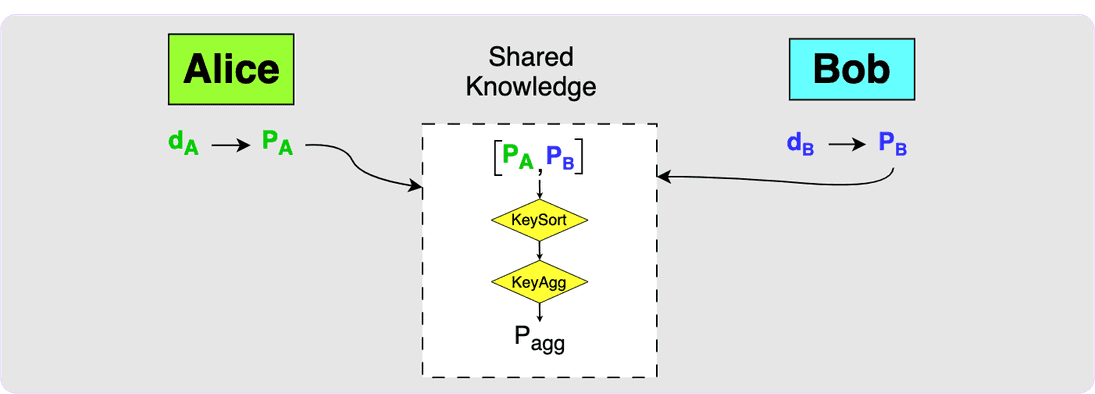
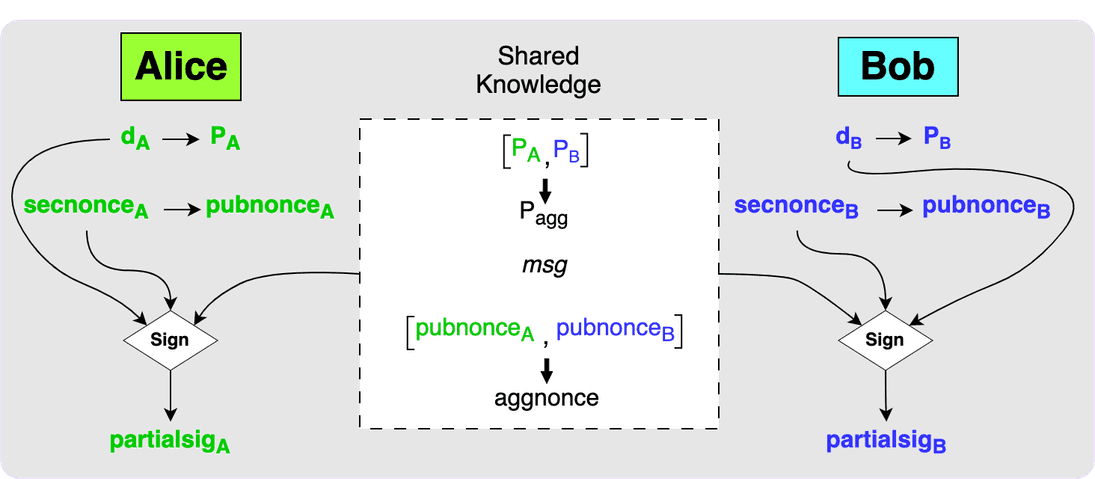
When the two parties decide to construct an output together, they will first
need to exchange public keys. Both parties will then use the MuSig2 KeySort
algorithm to sort the keys and then the KeyAgg algorithm to aggregate the
keys. This will produce the aggregate key, P_agg, which would be the key that
would appear in the transaction output.
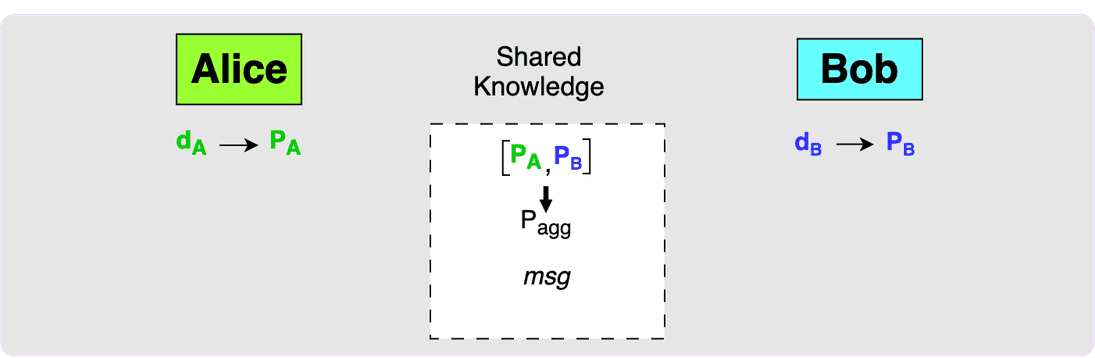
Once Alice and Bob have a shared message that they want to sign (which would most likely be the spending transaction), they can move onto the signing phase.
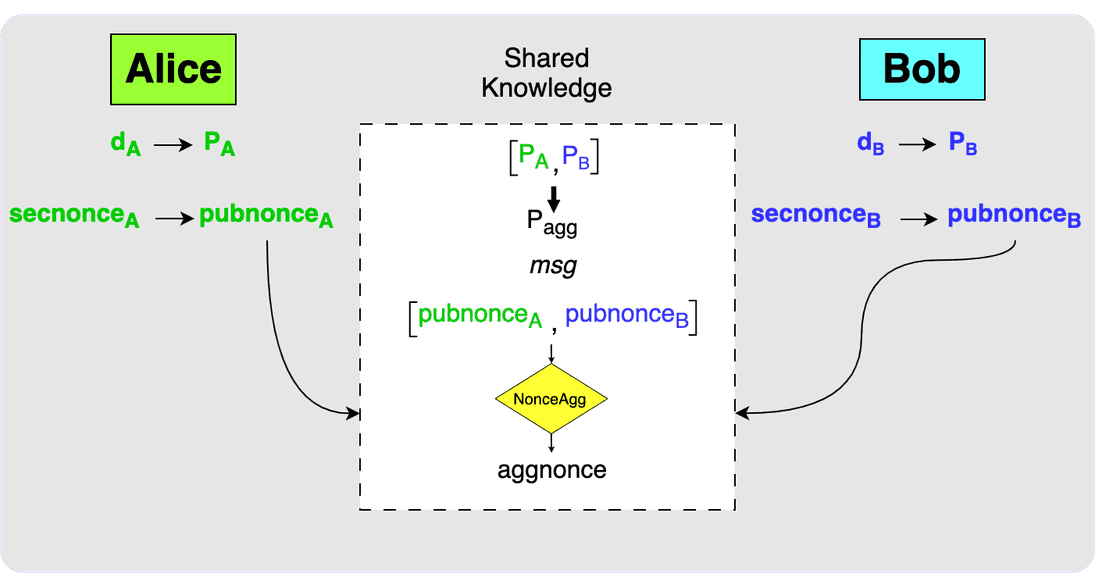
Step one of the signing phase involves each party generating nonces. They will
each generate a secret nonce, called the secnonce, and from the secnonce the
associated public nonce, called the pubnonce, can be determined. Note that
each secnonce is actually made up of two private keys and each pubnonce is
made up of the two public keys associated with those private keys. The details
of why there are two nonces is outside the scope of this post. Alice and Bob
will then need to exchange the public nonces and then both parties will use the
MuSig2 NonceAgg function to determine the aggregate nonce: aggnonce. Note
that this step had nothing to do with the message to be signed meaning that this
step can actually take place before the message to be signed is known.
When the public nonces have been exchanged and both parties know the message to
be signed then each party can use the MuSig2 Sign function to produce partial
signatures.
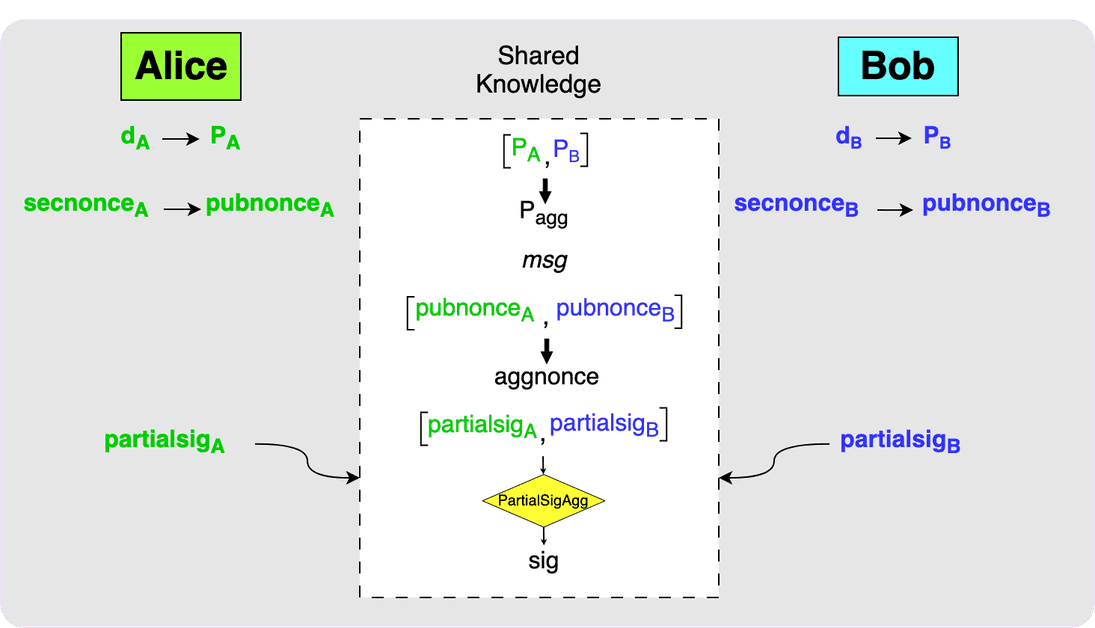
The final step is for the parties to exchange their partial signatures. Each
party can then use the MuSig2 PartialSigAgg function to calculate the final
signature. This signature will be a valid signature for P_agg over the
message, msg.
It is important to become familiar with the above MuSig2 flow because it will be used very often in the next few articles. In Taproot channels the funding output of a channel will be a MuSig2 aggregate public key. This means that every commitment transaction created that spends from the funding output will need to go through this signing flow. Since channel states in Lightning are asymmetric, this also means that this flow will need to happen twice per state update: once to sign the local commitment transaction and once to sign the remote one. But more on that in the next blog post :)
Thanks for reading! I hope that was useful. If you think there is anything that could use clarification or that is incorrect then please don’t hesitate to reach out to let me know.
Note: this article is a cross-post and you can read the original post on my blog.


Elle holds a bachelor’s degree in Electrical and Computer Engineering from the University of Cape Town, where her final-year project explored an incentivized mesh network built on the Lightning Network. After working on the crypto-operations team at Luno, she joined Lightning Labs and now contributes to LND, LiTd, and other projects. She also writes technical blog posts focused on Lightning protocol and infrastructure. In her spare time, you’ll find her kitesurfing, climbing, or playing guitar.