A Technical Overview of Virtual PSBTs in the Taproot Assets Protocol
The latest Taproot Assets Protocol release unlocks the full potential of the bitcoin scripting language for Taproot Assets, enabling developers to build popular constructions like multi-signature wallets and hash time lock contracts (HTLCs) for these new off-chain assets. To simplify the creation and transfer of assets that leverage these custom locking scripts, this release introduced the concept of virtual Partially Signed Bitcoin Transactions (vPSBTs). This post will explain what virtual and anchor PSBTs are and how they work. It will also show an example where a hash lock script is used to encumber an asset output with a custom spending condition.
To understand the Taproot Assets protocol at a high level before diving in, watch our latest YouTube video and read our comprehensive documentation.
Virtual Taproot Asset transactions vs. Anchor transactions
As explained in further detail in the corresponding BIP, a virtual Taproot Asset transaction represents a single state transition in an asset tree. When moving an asset from one owner to the next, such a state transition has many similarities to a bitcoin on-chain transaction: One or more inputs (asset leaves) are spent by showing a valid witness (e.g. a signature) by the previous owner(s) and one or more new outputs (asset leaves) are created identifying the new owners by their public keys. If the key of a spent input commits to a custom locking script (such as a multi-signature script), then multiple signers might need to coordinate to produce a valid witness. To inform each signer about what exactly they need to sign, a set of meta information needs to be attached to the raw state transaction itself.
This is exactly where virtual PSBTs come in: We encode the asset state transition and all meta information required by signers into a BIP-174 Partially Signed Bitcoin Transaction, that we then call a virtual PSBT (vPSBT).
By using several custom field types (defined in the Taproot Asset PSBT BIP) on the inputs and outputs of an asset, we can communicate the following metadata to each signer (non-exhaustive list for illustration):
Inputs:
- Previous asset leaf: the full TLV encoded asset leaf that is being spent by this input.
- Previous asset proof: the last proof of the asset that is being spent. This proves that the above asset leaf was actually committed in the anchor on-chain transaction listed below.
- Anchor information: the full information about the bitcoin level on-chain anchor transaction that committed the asset being spent by this input (we'll elaborate on this further in the next section).
Outputs:
- Output type: whether this output is a simple asset leaf, the root of an asset split or just commits to passive assets (explained further below).
- Interactive: whether the receiver of this output is fully aware of the asset leaf that is being created by the output (interactive, or sync flow, e.g. they receive the vPSBT at some point) or not (non-interactive, or async flow, they always expect a split output, which is always the case for the on-chain send-to-address flow).
- Anchor information: indicates where in the anchor transaction this asset output should be committed to (the anchor output index) and what Taproot key should be used for the anchor transaction output.
- Asset leaf: the full TLV encoded asset leaf that is being created by this output.
After all required participants submit their signatures, the asset state transition becomes valid, and we can proceed to the next step.
Before we go on-chain, we might want to commit more asset state transfers of different asset IDs into the same on-chain transaction. We simply repeat the steps outlined above for each other asset ID we want to transfer until we end up with a list of virtual Taproot Asset transactions that are all valid and fully signed.
It is important to mention here that a virtual Taproot Asset transaction (vPSBT) can only contain inputs and outputs that belong to the same asset (identical asset ID or grouped together by a group key). For more complex use cases such as asset swaps multiple virtual Taproot Asset transactions would be created, locking the swap outputs to the same locking script, so they could be swapped atomically. Those asset swap outputs would then be collected and anchored to the chain with the same on-chain anchor transaction.
Once we have prepared all virtual Taproot Asset transactions that we want to commit on-chain, it is now time to prepare the actual bitcoin level transaction that will commit those state updates. We call that bitcoin level transaction an anchor transaction, as it anchors the new asset tree states into the bitcoin chain.
As we learned above, each asset output on a virtual Taproot Asset transaction can specify what anchor transaction output it wants to be committed to. This is required when some of the assets leave the custody of the local node and are sent to an external receiver, while the change of those assets sends might all be collected into the same on-chain output that is sent back to the local node. So in order to construct the anchor transaction, we first need to find out how many outputs we need to commit all virtual Taproot Asset transactions. Then we collect all new asset leaves for each anchor output, commit them into the corresponding MS-SMT asset subtrees, then those into the main Taproot Asset tree and finally construct the Taproot output key from that tree's root. The resulting Taproot output key effectively timestamps the state transition on chain by committing to the Taproot Asset tree root hash of this new state fragment.
Now that we have the outputs of the anchor transaction defined, we also need to
create its inputs. To find out what bitcoin UTXOs we need to spend, we have to
take a look at each virtual Taproot Asset transaction's input anchor information, and we have
to spend each of those anchor inputs.
It is quite likely that an anchor UTXO that committed to one of the assets that
is being spent also contains other assets that aren't directly referenced by any
of the active/pending virtual Taproot Asset transactions. Those are called "passive assets"
and need to be re-anchored during the transfer as well, to prevent them from being
burned. This is done automatically by tapd and explains why there might be an
additional change output going back to the own node even if we send a single
asset fully to an external receiver.
In future versions of the Taproot Assets Protocol, a sighash flag similar to SIGHASH_ANYPREVOUT can be
introduced to remove the requirement of re-signing those passively transferred
assets.
The protocol requires that proofs of an asset demonstrate that each state
transition was valid, but for passive assets, a more specialized proof of
non-action can be introduced as well.
Example: Create a hash locked asset and spend it
Let's look at an actual example use of a virtual PSBT that locks an asset in a
hash lock script and then spends it again. The referenced code is from the
integration tests in the taproot-assets repository, with the
full example code located here.
Before we look at actual code, here is an overview of the relevant steps and the invoked RPCs of each step that we are going to take a closer look at in the following sections:
- Mint a single asset (
MintAsset) and finalize it in an on-chain minting batch (FinalizeBatch) with atapdnode calledalice. - Spin up a second
tapdnode calledboband derive a pair of keys, using theNextScriptKeyandNextInternalKeyRPCs. - Create a Tapscript tree with two script leaves. Derive a Taproot output key from that tree and the previously derived script key.
- Register a new Taproot Asset address on the
bobnode (NewAddr) to receive assets to the script key with the Tapscript tree created in the previous step. - Send the requested number of assets from
aliceto the just created address of thebobnode (SendAsset), locking those coins to the spending conditions defined in the Tapscript tree. - Now comes the interesting part: To send those coins back from
bobtoalicewe fund a virtual PSBT
(FundVirtualPsbt) with the intent to sending
some of the locked coins back to alice.
7. We create a valid asset transfer witness by putting the hash lock preimage on
the witness stack, together with the internal key and the control block (the
same way we would do this for a normal bitcoin Taproot script spend).
8. With the valid transfer witness added to the virtual PSBT, it is now time to
anchor the asset transfer onto a bitcoin anchor transaction
(AnchorVirtualPsbts), completing the
transfer.
Let's now look at some of these steps in more detail. We skip 1. minting the asset
and 2. spinning up the bob node. You can check out that part of the
code on lines 29 to 53 of the integration test
code. Instead, we will start with step 3. from the above list.
3. Derive keys for the asset script tree
var (
  alice    = t.tapd
  bob      = secondTapd
  numUnits = uint64(10)
)

// We need to derive two keys, one for the new script key and one for
// the internal key.
bobScriptKey, bobInternalKey := deriveKeys(t.t, bob)
With the alice and bob nodes now ready and the assets minted, we want to
send 10 of the 5000 assets minted to a script-encumbered root Asset address
of bob.
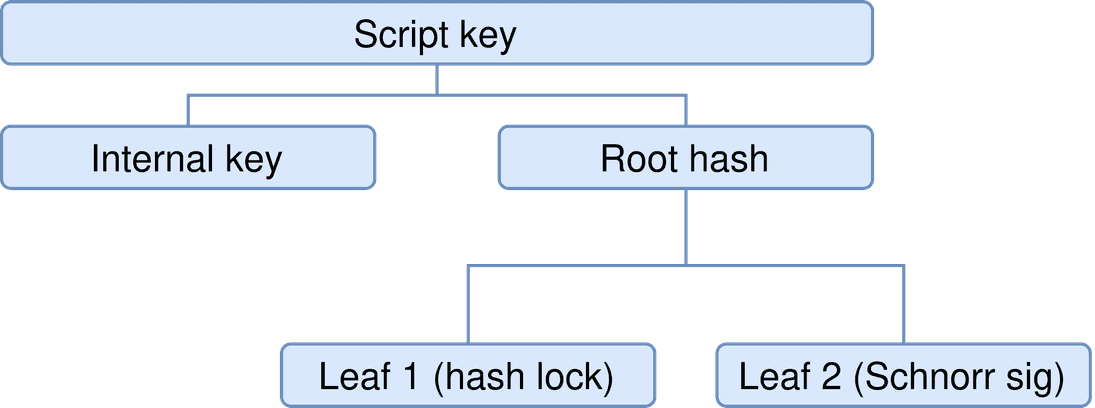
Taproot Assets (at version 0) scripts and keys work exactly like bitcoin Taproot scripts and keys: The public key that coins/assets are locked to is a tweaked Taproot output key that is created using an internal key and a Tapscript tree Merkle root hash. To avoid confusion between bitcoin output keys and asset output keys, we use the term "Script Key" when we refer to a tweaked Taproot output key that an asset is locked to.
The snippet shown above calls the helper function deriveKeys which
calls the NextScriptKey and
NextInternalKey RPCs on the bob daemon.
4. Create the asset script tree
// Now we create a script tree consisting of two simple scripts.
preImage := []byte("hash locks are cool")
leaf1 := test.ScriptHashLock(t.t, preImage)
leaf2 := test.ScriptSchnorrSig(t.t, bobScriptKey.PubKey)
leaf2Hash := leaf2.TapHash()
tapscript := input.TapscriptPartialReveal(
  bobScriptKey.PubKey, leaf1, leaf2Hash[:],
)
rootHash := tapscript.ControlBlock.RootHash(leaf1.Script)
This snippet creates a Tapscript tree with two script leaves: One is a
hash lock to the preimage hash locks are cool, the other one is a simple
Schnorr signature check for Bob's script key.
This is obviously not an example that would be useful in any real world scenario, and is also not really efficient. But it is sufficient for demonstrating how we can spend the asset again. With the script tree constructed we basically have the following three options to spend:
- Use the Taproot key spend path, using a signature produced with
bobScriptKey.PubKeyas the single witness element. - Use the preimage script path defined in
leaf1by placing the preimage as the first witness element, followed by theleaf1script and the control block (which in this case needs to contain the internal keybobScriptKey.PubKeyand the hash ofleaf2as the Merkle inclusion proof). - Use the Schnorr signature script path defined in
leaf2by placing a Schnorr signature produced withbobScriptKey.PubKeyas the first witness element, followed by theleaf2script and the control block (which in this case needs to contain the internal keybobScriptKey.PubKeyand the hash ofleaf1as the Merkle inclusion proof).
We are going to choose option 2 in this example, which means we are going to
show the script in leaf1 and an inclusion proof for leaf2.
5. Send assets to the script address
We now instruct alice to send 10 of her minted coins to the script key with
the tapscript script tree:
sendToTapscriptAddr(
  ctxt, t, alice, bob, numUnits, genInfo, mintedAsset,
  bobScriptKey, bobInternalKey, tapscript, rootHash,
)

// Now try to send back those assets using the PSBT flow.
aliceAddr, err := alice.NewAddr(ctxb, &taprpc.NewAddrRequest{
  AssetId: genInfo.AssetId,
  Amt:     numUnits / 2,
})
require.NoError(t.t, err)
assertAddrCreated(t.t, alice, rpcAssets[0], aliceAddr)
The helper function sendToTapscriptAddr does this by calling bob.NewAddr()
and then sending coins to that generated Taproot Asset address:
bobAddr, err := bob.NewAddr(ctx, &taprpc.NewAddrRequest{
  AssetId: genInfo.AssetId,
  Amt:     numUnits,
  ScriptKey: &taprpc.ScriptKey{
    PubKey:   schnorr.SerializePubKey(bobAssetScriptKey),
    KeyDesc:  lndKeyDescToTap(bobScriptKey.RawKey),
    TapTweak: rootHash,
  },
  InternalKey: lndKeyDescToTap(bobInternalKey),
})

...

sendResp := sendAssetsToAddr(t, alice, bobAddr)
Since we want to show how to spend coins from such a script-encumbered asset output address, we immediately ask Alice to create another Taproot Asset address for half the amount Bob received, so we can send half of the assets back.
6. Fund a virtual PSBT to send script-locked coins from Bob back to Alice
The first step for spending an asset through a virtual PSBT is to call
FundVirtualPsbt, which the helper function
fundAddressSendPacket does for us.
fundResp := fundAddressSendPacket(t, bob, aliceAddr)

fundedPacket, err := tappsbt.NewFromRawBytes(
  bytes.NewReader(fundResp.FundedPsbt), false,
)
require.NoError(t.t, err)
The result is a virtual PSBT encoded as raw bytes, which we then decode into the
tappsbt.VPacket struct with tappsbt.NewFromRawBytes(), so we can add our
preimage, script and control block to it manually in the next step.
7. Create the preimage witness for the asset script spend
// We don't need to sign anything as we're going to spend with a
// pre-image to the script lock.
controlBlockBytes, err := tapscript.ControlBlock.ToBytes()
require.NoError(t.t, err)
senderOut := fundedPacket.Outputs[0].Asset
senderOut.PrevWitnesses[0].TxWitness = [][]byte{
  preImage, leaf1.Script, controlBlockBytes,
}
This snippet creates the full transfer witness for spending the leaf1 script
path. As mentioned above, we need to provide the actual preimage, the full
script we are executing and the control block that contains the internal key
and the Merkle tree inclusion proof for any non-executed scripts in the tree.
This next part of the code is very specific to Taproot Assets. Any time a state transition creates multiple outputs as part of the transaction, an asset split may be required. An important cornerstone in Taproot Assets is that the supply of an asset is never inflated, as that would let users create more assets "out of thin air". To make such an invalid state transition easily audible, all the created outputs are inserted into a new MS-SMT tree called a "split commitment tree". This tree commits to the sum of the value of all the outputs. In order to prove that no assets were inflated, then this value must match the sum of all the inputs into the state transition.
Because we are creating an asset split in the example (sending half of the 10 received assets back while keeping the other half), only the so-called "Root Asset" of the split will contain the actual transfer witness we created in the previous step. The root asset is usually the asset going back to the sender, containing the asset change, while the so-called "Split Assets" are created for the receiver(s) of a transfer. Each of the split assets have a split commitment that proves the split did not inflate or burn the asset supply. That split commitment also has a reference to the root asset that contains the witness that makes the transfer valid.
for idx := range fundedPacket.Outputs {
  out := fundedPacket.Outputs[idx]
  splitAsset := out.Asset

  if out.Type.IsSplitRoot() {
    splitAsset = out.SplitAsset
  }

  splitCommitment := splitAsset.PrevWitnesses[0].SplitCommitment
  splitCommitment.RootAsset = *senderOut.Copy()
}
The snippet above simply updates the root asset within the split commitment of each split asset.
8. Anchoring the asset transfer on-chain
var b bytes.Buffer
err = fundedPacket.Serialize(&b)
require.NoError(t.t, err)

// Now we'll attempt to complete the transfer.
sendResp, err := bob.AnchorVirtualPsbts(
  ctxb, &wrpc.AnchorVirtualPsbtsRequest{
    VirtualPsbts: [][]byte{b.Bytes()},
  },
)
require.NoError(t.t, err)
With the virtual PSBT now being a fully valid asset transfer, it is time to
anchor that virtual Taproot Asset transaction inside an on-chain bitcoin transaction. That
is done automatically by the asset wallet through the
AnchorVirtualPsbts RPC. The wallet will
read the anchor information embedded in the virtual PSBT to figure out what key
and index to use when placing the updated Taproot Asset MS-SMT root in the
bitcoin level anchor output.
The remainder of the integration test code simply verifies that the transfer went through successfully and then also lists the transfer.
Here is how such a transfer might look like when calling the
ListTransfers RPC (or running
tapcli assets transfers) after executing the above steps (omitting the
proofs as they are very long):
{
  "transfers": [
    {
      "transfer_timestamp": "1685710337",
      "anchor_tx_hash": "da9d0425793f80158f9b15a70d731fdb5c7beb90241399160b24f9ab51d8a52e",
      "anchor_tx_height_hint": 442,
      "anchor_tx_chain_fees": "3315",
      "inputs": [
        {
          "anchor_point": "e0470e2b7ce0729443163da1699ba3d7bb5cc0d34b87cc06cf0fd787958f2b65:1",
          "asset_id": "d29b1eee9b9e522515d52361f887d14a2256133ff0160c3e3329050fc0eb05f9",
          "script_key": "02de836d716670e092b1ffa4156808394ea2934f545f01cc31b6f56755a709e4b8",
          "amount": "10"
        }
      ],
      "outputs": [
        {
          "anchor": {
            "outpoint": "2ea5d851abf9240b1699132490eb7b5cdb1f730da7159b8f15803f7925049dda:0",
            "value": "1000",
            "internal_key": "024974f22234efa364259eb8fc36424066f909b29a55cc0686db23ba1b91dada64",
            "taproot_asset_root": "0d0f6965d8dfca365a901679f785ffa394f2e59b2d8defaa911f64b6d8b8ab30",
            "merkle_root": "0d0f6965d8dfca365a901679f785ffa394f2e59b2d8defaa911f64b6d8b8ab30",
            "tapscript_sibling": "",
            "num_passive_assets": 0
          },
          "script_key": "022064e034ef4629806a5b01b04d33cc9c041493a31bb3bbf9259e6bea315a75a1",
          "script_key_is_local": true,
          "amount": "5",
          "new_proof_blob": "<omitted>",
          "split_commit_root_hash": "5196e56eab5e5d03201c1cccc0728f5ac186d296edc0933df4616fcfcadd9d36",
          "output_type": "OUTPUT_TYPE_SPLIT_ROOT"
        },
        {
          "anchor": {
            "outpoint": "2ea5d851abf9240b1699132490eb7b5cdb1f730da7159b8f15803f7925049dda:1",
            "value": "1000",
            "internal_key": "03c2b24b23e16443920c561ce0d3b5eb6e1fa6eafbb50a74c5671c20fa67d909c1",
            "taproot_asset_root": "694ebfd4e74ccb790561c623d269c7ae7b244a89827b1ce072d88bd14d1eeac9",
            "merkle_root": "694ebfd4e74ccb790561c623d269c7ae7b244a89827b1ce072d88bd14d1eeac9",
            "tapscript_sibling": "",
            "num_passive_assets": 0
          },
          "script_key": "027f2d9bf1384ce61533f7b03af6bd91a9c20a413d863ee094ea584de4e9009bd6",
          "script_key_is_local": false,
          "amount": "5",
          "new_proof_blob": "<omitted>",
          "split_commit_root_hash": "",
          "output_type": "OUTPUT_TYPE_SIMPLE"
        }
      ]
    }
  ]
}
And the asset as it appears in Alice's wallet with the transfer witness:
{
  "version": 0,
  "asset_genesis": {
    "genesis_point": "0753b1f4bfe2508992b680d1cb1c559486efa5611d265e2a2b7779c526897503:0",
    "name": "itestbuxx",
    "meta_hash": "0f31bf70e34126ee51edb2d4a30d7580f5d2da029ab5f68ed36bbd30e61e1d1b",
    "asset_id": "d29b1eee9b9e522515d52361f887d14a2256133ff0160c3e3329050fc0eb05f9",
    "output_index": 0,
    "version": 0
  },
  "asset_type": "NORMAL",
  "amount": "5",
  "lock_time": 0,
  "relative_lock_time": 0,
  "script_version": 0,
  "script_key": "027f2d9bf1384ce61533f7b03af6bd91a9c20a413d863ee094ea584de4e9009bd6",
  "script_key_is_local": true,
  "asset_group": null,
  "chain_anchor": {
    "anchor_tx": "<omitted>",
    "anchor_txid": "2ea5d851abf9240b1699132490eb7b5cdb1f730da7159b8f15803f7925049dda",
    "anchor_block_hash": "9fdeafad3be9075e8cba67f462bfa86fdf6da2b7ec0ce79a9fe36d9ec34c175f",
    "anchor_outpoint": "2ea5d851abf9240b1699132490eb7b5cdb1f730da7159b8f15803f7925049dda:1",
    "internal_key": "03c2b24b23e16443920c561ce0d3b5eb6e1fa6eafbb50a74c5671c20fa67d909c1",
    "merkle_root": "694ebfd4e74ccb790561c623d269c7ae7b244a89827b1ce072d88bd14d1eeac9",
    "tapscript_sibling": ""
  },
  "prev_witnesses": [
    {
      "prev_id": {
        "anchor_point": "e0470e2b7ce0729443163da1699ba3d7bb5cc0d34b87cc06cf0fd787958f2b65:1",
        "asset_id": "d29b1eee9b9e522515d52361f887d14a2256133ff0160c3e3329050fc0eb05f9",
        "script_key": "02de836d716670e092b1ffa4156808394ea2934f545f01cc31b6f56755a709e4b8",
        "amount": "10"
      },
      "tx_witness": [],
      "split_commitment": {
        "root_asset": {
          "version": 0,
          "asset_genesis": {
            "genesis_point": "0753b1f4bfe2508992b680d1cb1c559486efa5611d265e2a2b7779c526897503:0",
            "name": "itestbuxx",
            "meta_hash": "0f31bf70e34126ee51edb2d4a30d7580f5d2da029ab5f68ed36bbd30e61e1d1b",
            "asset_id": "d29b1eee9b9e522515d52361f887d14a2256133ff0160c3e3329050fc0eb05f9",
            "output_index": 0,
            "version": 0
          },
          "asset_type": "NORMAL",
          "amount": "5",
          "lock_time": 0,
          "relative_lock_time": 0,
          "script_version": 0,
          "script_key": "022064e034ef4629806a5b01b04d33cc9c041493a31bb3bbf9259e6bea315a75a1",
          "script_key_is_local": false,
          "asset_group": null,
          "chain_anchor": null,
          "prev_witnesses": [
            {
              "prev_id": {
                "anchor_point": "e0470e2b7ce0729443163da1699ba3d7bb5cc0d34b87cc06cf0fd787958f2b65:1",
                "asset_id": "d29b1eee9b9e522515d52361f887d14a2256133ff0160c3e3329050fc0eb05f9",
                "script_key": "02de836d716670e092b1ffa4156808394ea2934f545f01cc31b6f56755a709e4b8",
                "amount": "0"
              },
              "tx_witness": [
                "68617368206c6f636b732061726520636f6f6c",
                "76a9148f15527faa0d84ce8bd364e32d4b627fb48efb9288",
                "c158dde603820990e761ecd44880ba5f324e0e37e8805d832c3c4a0a7c02daf94f7eba31be251563fff1943957c356b7a97ceffd6cb44b0a1aa9f974c8decc44c3"
              ],
              "split_commitment": null
            }
          ],
          "is_spent": false
        }
      }
    }
  ],
  "is_spent": false
}
Try it for yourself
We encourage all developers and builders to try out the features provided by the RPCs demonstrated above, and to learn more about the concept of virtual PSBTs in general.
With this new protocol, our goal is to educate the developer community about the many new concepts involved, and how best to use them in their applications. We hope this article is helpful for developers looking to learn more about Taproot Assets!
Please do not hesitate to give us feedback to this article, our
documentation on Taproot Assets, or any issues you might
run into while running tapd.
The easiest way to give feedback is to start a
discussion or create an
issue in the Taproot Assets GitHub repository.
If you haven't already, join our Slack community or contact us on Twitter.
And if you're interested in contributing to Taproot Assets directly, we are actively hiring protocol engineers and infrastructure devs!
